If you've ever wanted to grow lush aquatic plants like Monte Carlo or Staurogyne repens but felt intimidated by the complexity of CO2 systems, you're not alone. Setting up CO2 can seem daunting at first, but it doesn’t have to be complicated or expensive. In this guide, inspired by the expert walkthrough from BRSfresh, we’ll explore how an all-in-one CO2 kit can simplify the process and get you on the path to a thriving planted tank. Whether you’re a beginner or looking for an efficient setup, this article breaks down the steps and essentials to help you succeed with the best CO2 kit for your aquarium.
Table of Contents
- Why Choose an All-in-One CO2 Kit?
- What’s Included in the Kit and Why It Matters
- Step-by-Step Setup Guide
- Monitoring and Fine-Tuning Your CO2 Levels
- Essential Tip: Use a Timer for Efficiency
- Conclusion
- Frequently Asked Questions (FAQ)
Why Choose an All-in-One CO2 Kit?
The biggest hurdle for many aquarists starting with CO2 is the fear of a complicated setup and maintenance. But kits like the ISTA CO2 kit make it straightforward by including everything you need in one package. This particular kit was the first one I ever used, and what I love most about it is that it takes all the guesswork out of the equation.

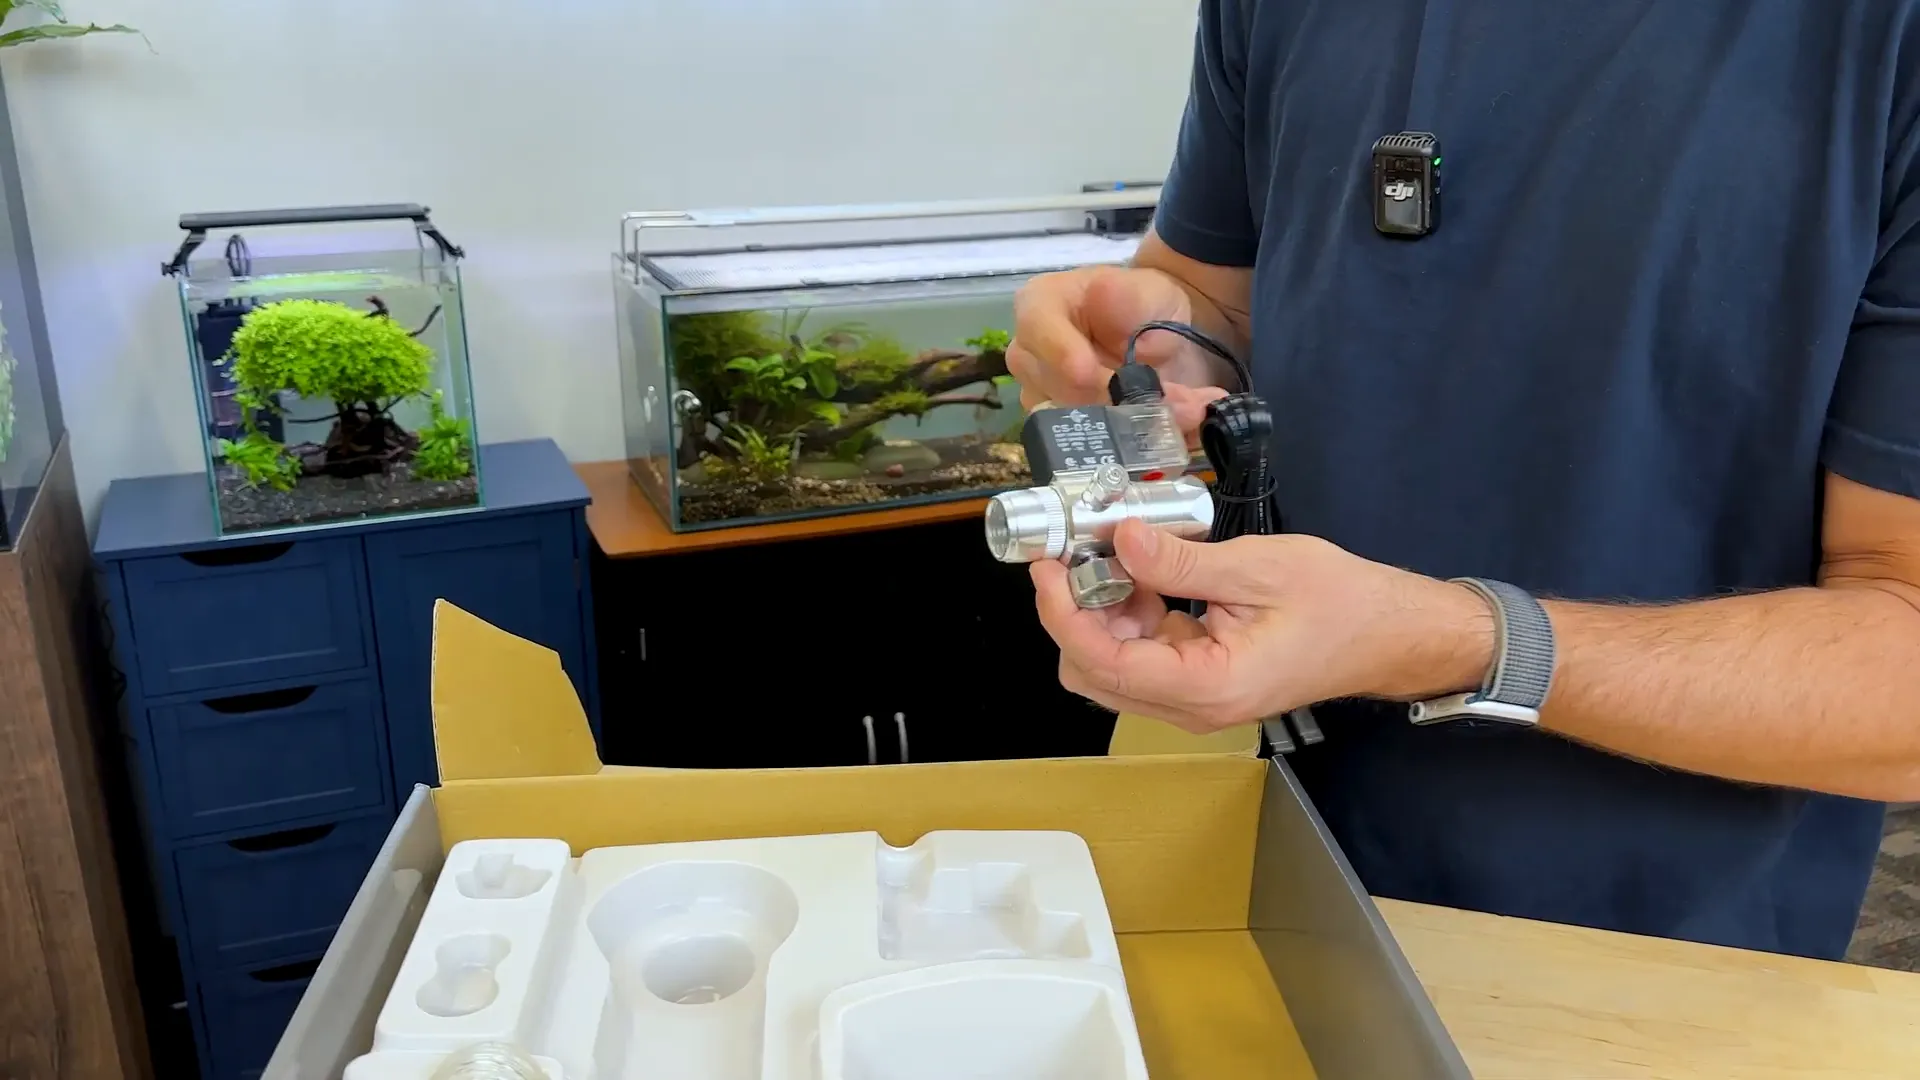
Inside the box, you get a fully filled CO2 cylinder, a regulator with a solenoid and valve, airline tubing, a diffuser, a bubble counter, a check valve, an indicator solution, and even a stand for the cylinder. The instructions are clear and easy to follow, guiding you in just nine steps from zero to fully working CO2 on your tank.
What’s Included in the Kit and Why It Matters
- Complete Cylinder: Unlike buying an empty cylinder and hunting for refill stations, this kit comes with a filled cylinder that easily lasts six months or more for moderate tank sizes.
- Regulator with Solenoid and Valve: This all-in-one component controls CO2 pressure and flow, and lets you know how much CO2 is being delivered.
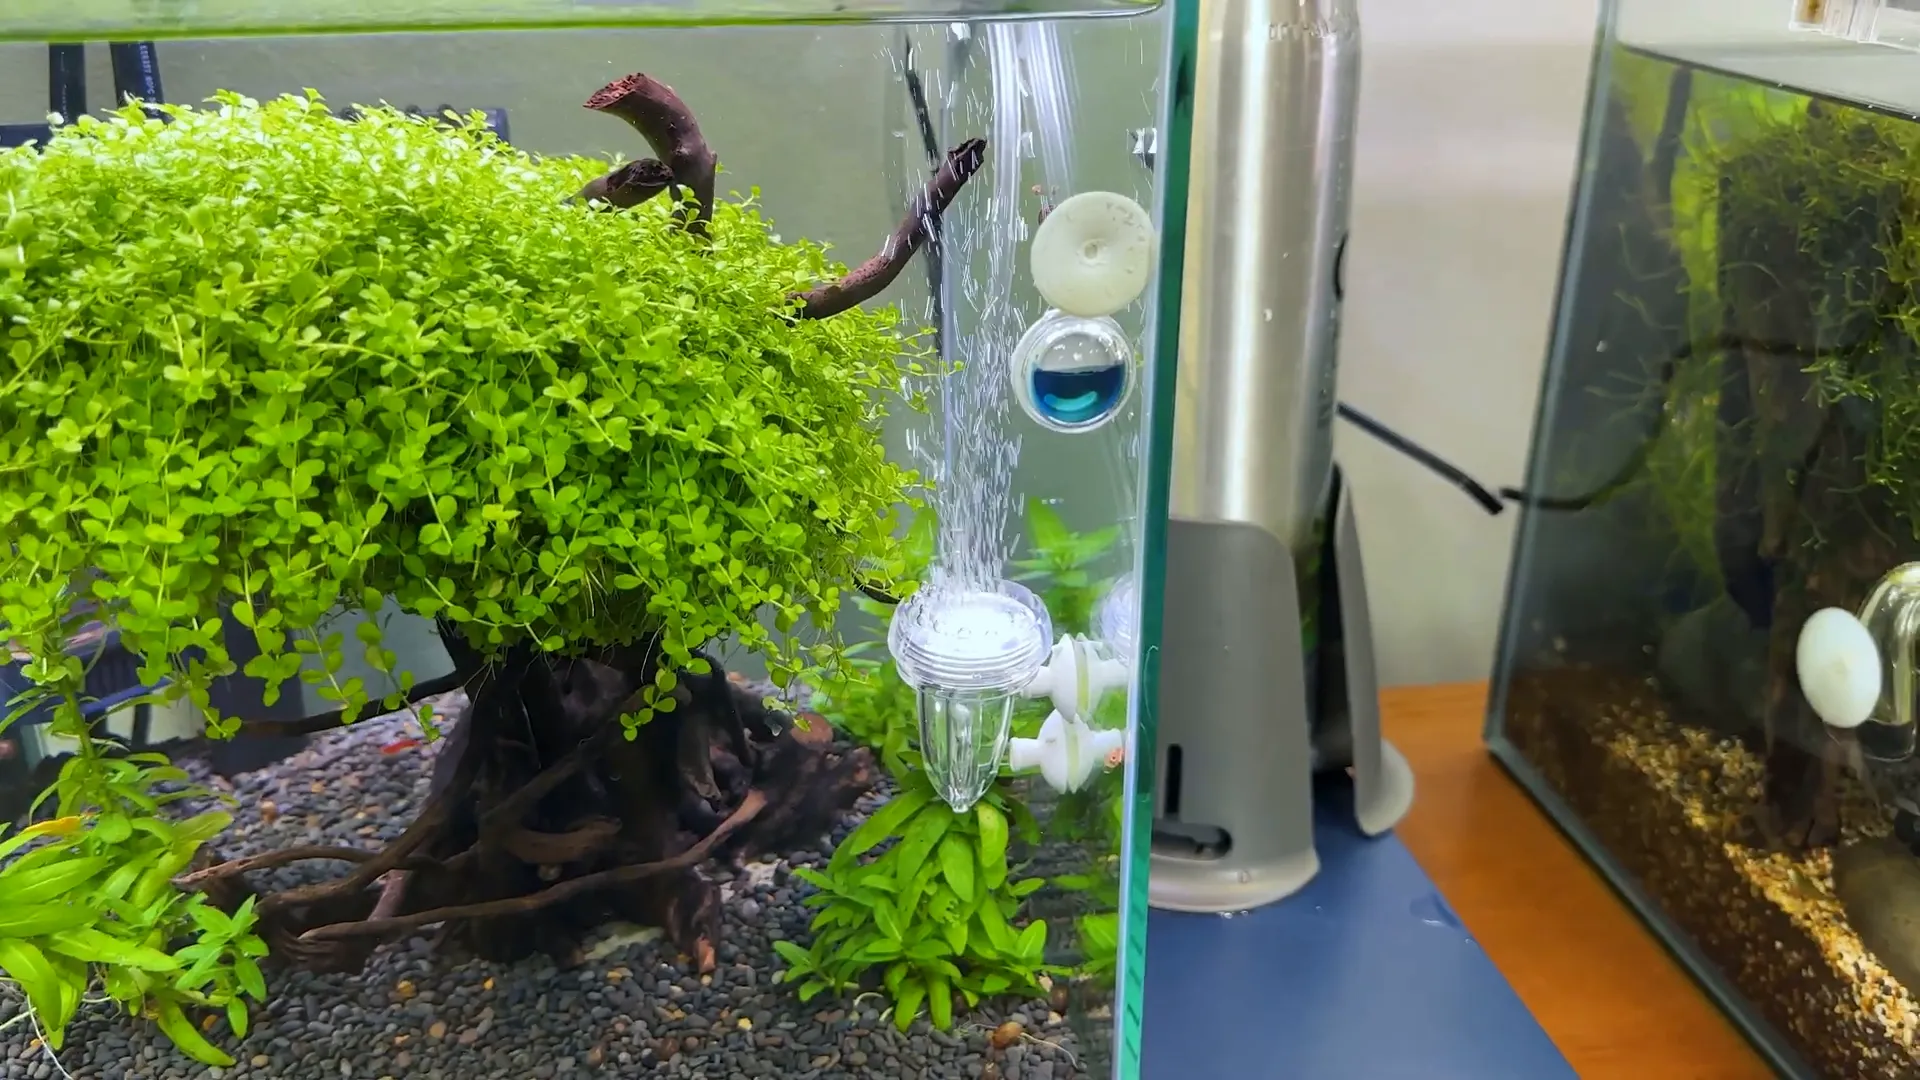
- Bubble Counter and Diffuser: The bubble counter helps you visually monitor the CO2 flow rate, while the diffuser ensures CO2 is dispersed as tiny bubbles for optimal absorption.
- Check Valve: Prevents water from flowing back into the system, protecting your equipment.
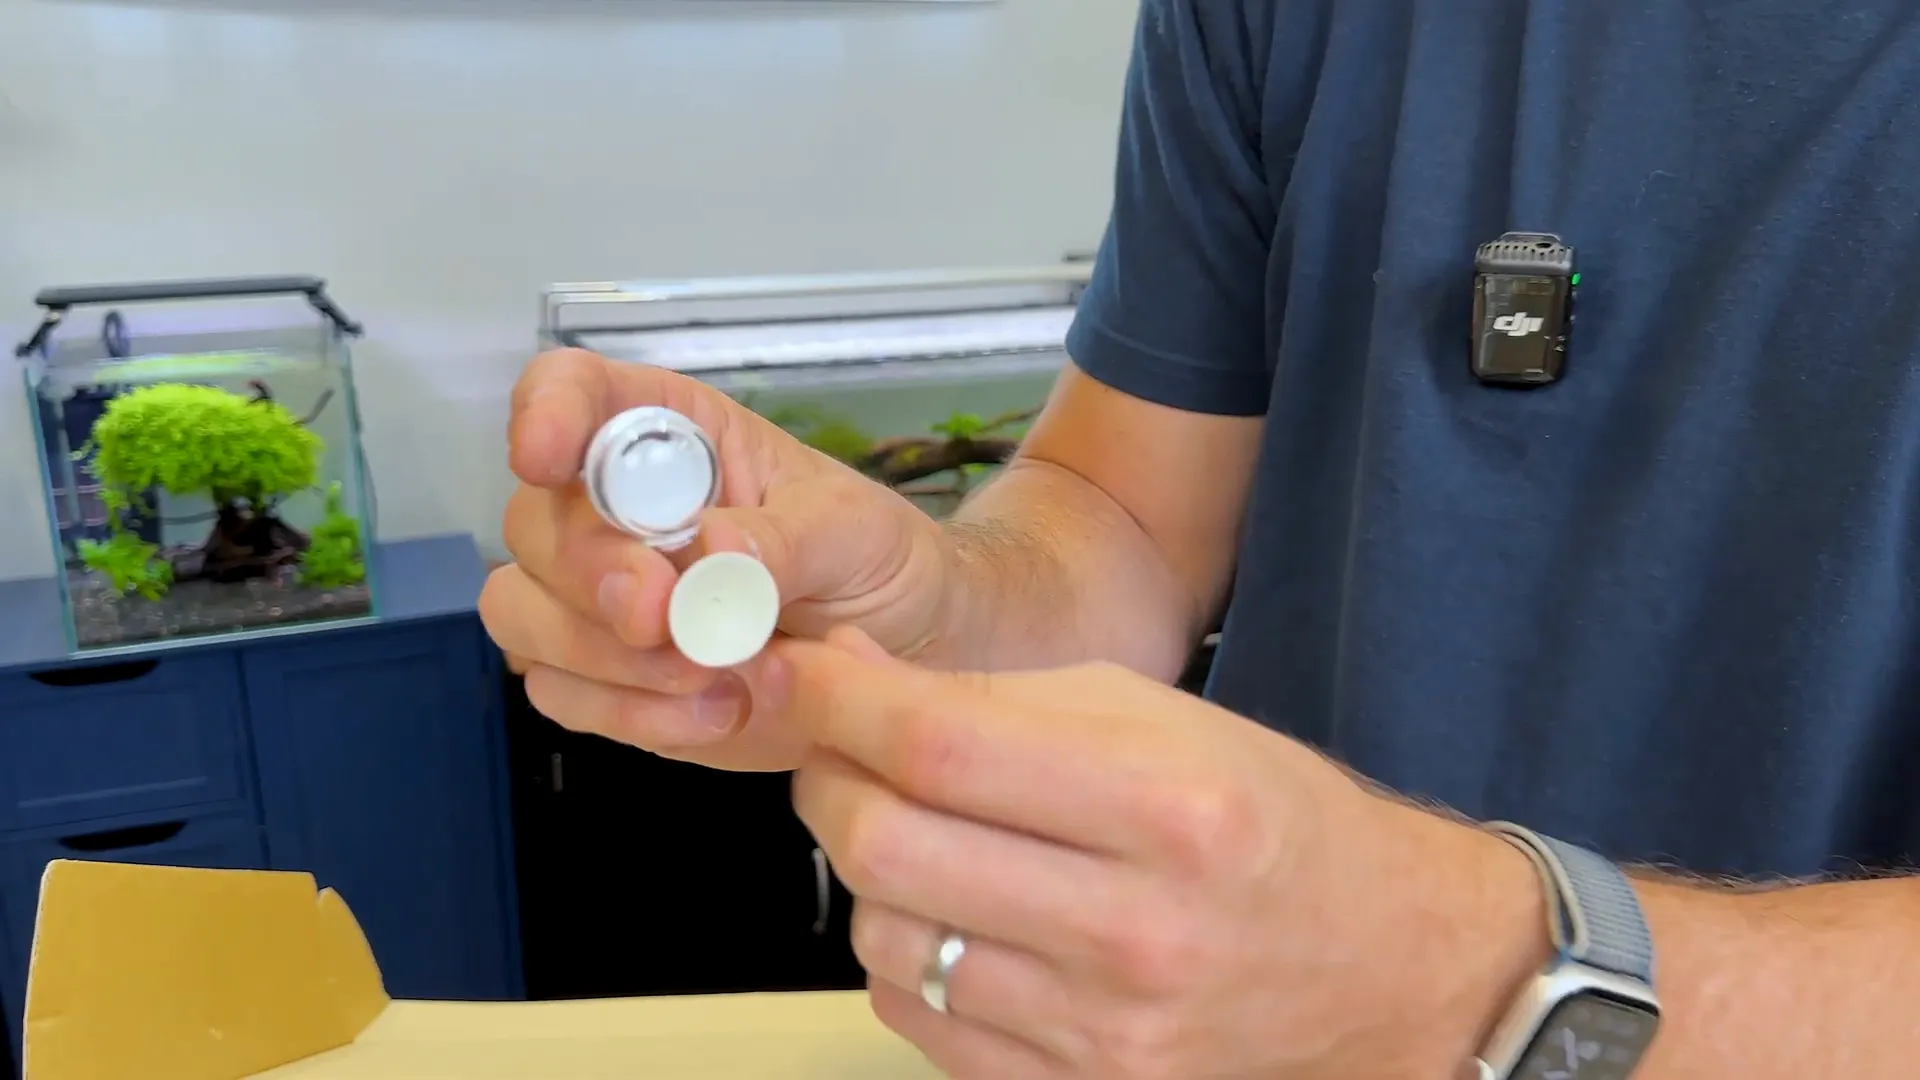
- Indicator Solution: Sticks inside your tank and changes colour to let you know if your CO2 levels are too high, too low, or just right.
- Stand and Tubing Keeper: Keeps everything neat and secure, preventing tubing from flaring out awkwardly.
Step-by-Step Setup Guide
Setting up your CO2 system is easier than you might think. Here’s how to do it in nine easy steps:
- Assemble the Stand: Start by building the base that will hold your CO2 cylinder securely. Pay attention to the direction and spacing of the teeth to avoid the cylinder hitting the stand.
- Attach the Regulator: Screw the regulator onto the cylinder finger-tight—no wrench needed. Remove any unnecessary rings beforehand.
- Connect the CO2 Hose: Slide the clamp onto the tubing, attach it securely to the regulator, and tighten the clamp to avoid leaks.
- Fill the Indicator Solution: Pop off the back of the indicator and fill it with the blue solution. Too much can spill out, so fill carefully.
- Prepare the Bubble Counter and Diffuser: Remove the diffuser plate and fill the bubble counter with tank water. This helps you see the CO2 bubbles clearly as they rise.
- Position the Tubing: Use the tubing keeper to run the CO2 line neatly over the back of your tank, avoiding messy flaring.
- Cut and Insert Tubing: Cut the tubing about two to three inches above the bottom of the tank to ensure bubbles dissolve fully. Insert the diffuser on the sidewall inside the aquarium.
- Power the System: Plug the solenoid into a timer and an electrical outlet. You’ll hear a click and see a light when it’s ready.
- Adjust CO2 Flow: Open the cylinder valve and dial the flow rate. Initially, gas won’t come out immediately; give it up to a minute to start bubbling. Aim for about 1-2 bubbles per second.
Monitoring and Fine-Tuning Your CO2 Levels
The indicator solution inside your tank is your best friend for monitoring CO2 levels. It changes colour based on the amount of CO2:
- Green: Perfect CO2 level
- Yellow: Too much CO2—tighten the regulator slightly
- Blue: Too little CO2—turn up the flow
Keep an eye on this indicator, especially in the first few days, to find the sweet spot. Once dialled in, your system should run smoothly without frequent adjustments.
Essential Tip: Use a Timer for Efficiency
One crucial step many overlook is plugging your CO2 system into a timer. You don’t want CO2 running 24/7. Instead, set the timer to turn on about one hour before your aquarium lights come on and turn off when the lights go off. This aligns CO2 delivery with your plants’ photosynthesis cycle, maximizing growth and preventing waste.
Conclusion
Getting started with CO2 doesn’t have to be intimidating or complicated. With a comprehensive and affordable kit like the ISTA CO2 kit, you can set up a reliable system in just a few easy steps. From the fully filled cylinder to the handy indicator solution and bubble counter, this all-in-one kit is a fantastic choice for beginners and intermediate aquarists alike.
Remember, the key to success is careful setup, monitoring your CO2 levels with the indicator, and using a timer to sync with your lighting schedule. With these tips and the right kit, you’ll be well on your way to growing vibrant, healthy aquatic plants and transforming your aquarium into a lush underwater paradise.
Frequently Asked Questions (FAQ)
How long does the CO2 cylinder last?
For a tank size similar to the one shown, the filled cylinder can last at least six months, depending on your CO2 flow rate and tank size.
Do I need to buy extra parts to use this kit?
No, the kit comes complete with everything you need to start. However, you can upgrade components like the diffuser or bubble counter later if you want a different look or better performance.
How do I know if my CO2 levels are correct?
Use the included indicator solution. It changes colour based on CO2 levels—green means perfect, yellow means too high, and blue means too low.
Why should CO2 be timed with aquarium lights?
Plants only use CO2 during photosynthesis, which happens when lights are on. Running CO2 when lights are off is inefficient and can harm fish due to oxygen depletion.
Can I set up this CO2 kit myself if I’m a beginner?
Absolutely. The kit’s instructions are easy to follow, and with the step-by-step guide above, you can confidently set up your system without stress.
This article was inspired from the video Is This The Best CO2 Kit? | Drop a like and subscribe to show your support!