Welcome to a comprehensive guide on the Marine Tank Cycle, inspired by the expertise and hands-on approach. Setting up a reef aquarium is an exciting adventure, but one of the most crucial—and often misunderstood—aspects is the cycling process. Understanding what happens during this cycle, what parameters to monitor, and when your tank is ready for livestock can make all the difference in the success of your marine aquarium.
In this article, I’ll take you through the four essential steps of the marine tank cycle, share insights from a soft coral display setup, and explain why adding a quality protein skimmer is a game changer for achieving a healthy, thriving reef. Whether you’re a beginner or looking to refine your reef-keeping skills, this detailed walkthrough will give you the confidence and knowledge to get your tank cycling right the first time.
Table of Contents
- 🌊 Understanding the Marine Tank Cycle: Why It Matters
- 🧪 Step 1: The Ammonia Cycle – The Starting Point
- 🔬 Step 2: The Nitrite Cycle – The Next Toxic Phase
- 🌿 Step 3: The Nitrate Cycle – Moving Towards Stability
- 🪴 Step 4: The Uglies – Algae and Other Growths
- 💧 Where Is My Soft Coral Tank in the Cycle?
- ⚙️ Adding a Protein Skimmer to Help Complete the Cycle
- 🔧 Setting Up the Skimmer: First Impressions and Adjustments
- ⌛ One Week Later: Skimmer Performance and Tank Progress
- 💡 Next Steps: Lighting, the Ugly Phase, and Livestock Introduction
- 🤝 Final Thoughts and Community Support
- ❓ Frequently Asked Questions (FAQ) About the Marine Tank Cycle
🌊 Understanding the Marine Tank Cycle: Why It Matters
The Marine Tank Cycle is the biological process that establishes a stable and safe environment for marine life by converting harmful substances into less toxic forms. When setting up a new reef tank, you’re essentially cultivating beneficial bacteria that break down waste products like ammonia and nitrites, which are poisonous to fish and invertebrates, into nitrates and eventually harmless nitrogen gas.
There is a wealth of information available online about the cycle, which can sometimes feel overwhelming. I want to simplify it into four clear steps, based on both scientific understanding and personal experience:
- The Ammonia Cycle
- The Nitrite Cycle
- The Nitrate Cycle
- The "Uglies" Phase
By breaking it down into these four stages, you can better track your tank’s progress and know exactly when it’s safe to introduce your precious livestock.
🧪 Step 1: The Ammonia Cycle – The Starting Point
Ammonia is the first chemical to appear when organic matter begins to decompose in your tank. This could come from a variety of sources:
- Adding bottled ammonia directly to the water
- Introducing food or uncooked seafood like prawns
- Fish waste (though I personally avoid this method as it’s tough on fish and less ethical)
For my soft coral tank, I used ammonia that came with the Aquaforest live biosand, supplemented with a phantom feed—a small pinch of pellets added right after filling the tank. This combination kickstarted the cycle by providing ample ammonia for bacteria to feed on.
If you have access to an ammonia test kit, or your local fish shop can test your water, you’ll notice an initial spike in ammonia levels. This spike will stay high for some time before starting to drop, signaling the growth of the first group of beneficial bacteria that convert ammonia into nitrite.
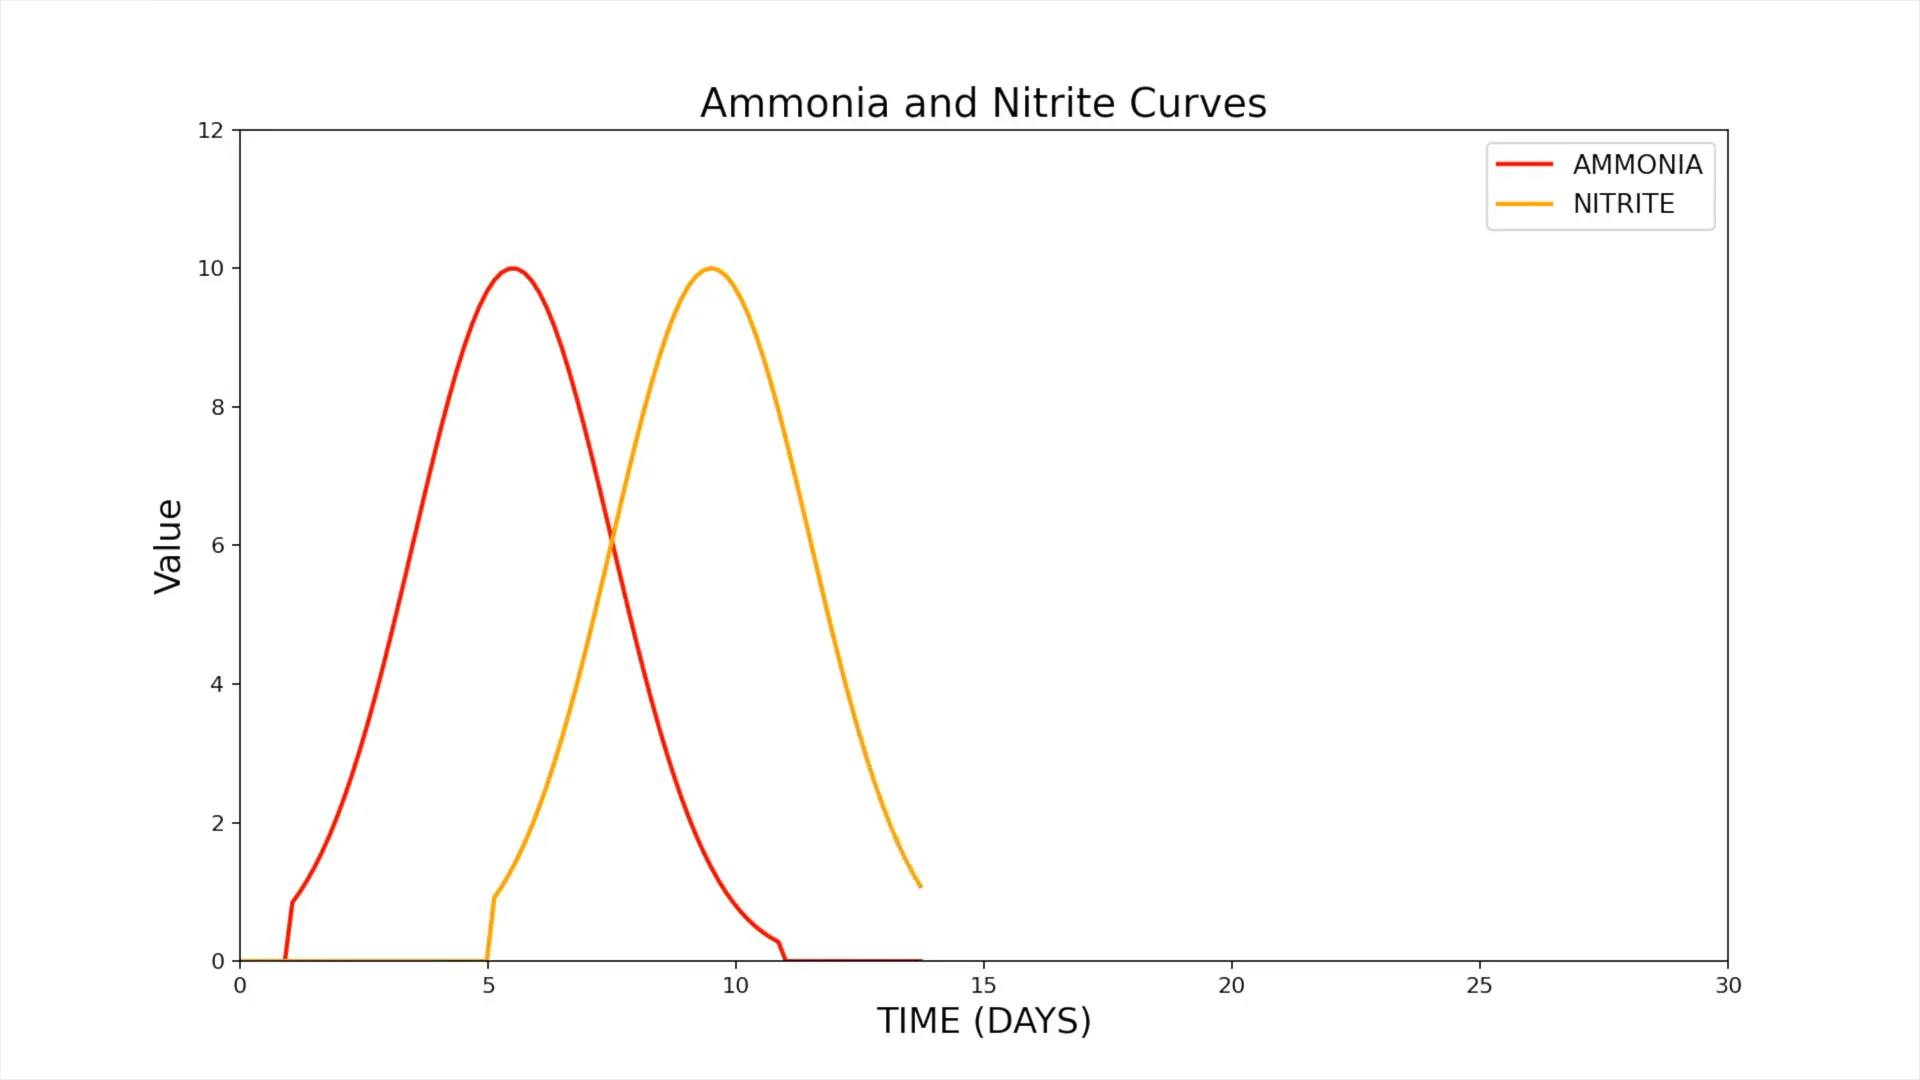
🔬 Step 2: The Nitrite Cycle – The Next Toxic Phase
Once ammonia levels begin to decline, you’ll see nitrite levels rise. Nitrites are still toxic to your tank inhabitants, so this stage requires patience and careful monitoring. The bacteria responsible for this step convert ammonia into nitrites, but nitrites must be further processed before your tank is safe.
During this phase, ammonia will continue to drop, ideally to zero, while nitrites peak and then start to fall. It’s important not to add any new sources of organic matter such as food or fish during this time, as it can prolong or disrupt the cycle.
Continuing with regular testing is key here. You want to see nitrites eventually drop towards zero as the next group of bacteria begins converting nitrites into nitrates.
🌿 Step 3: The Nitrate Cycle – Moving Towards Stability
As nitrites decline, nitrates will start to increase. Nitrates are much less harmful than ammonia or nitrites, but they still need to be managed to maintain a healthy reef environment. At this point, your ammonia and nitrite levels should both be at or near zero.
Some hobbyists start adding livestock once ammonia and nitrites hit zero, but I recommend waiting a bit longer. This allows the bacteria that consume nitrates to fully establish themselves. These bacteria live deep inside live rock and ceramic media, converting nitrates into nitrogen gas, which safely escapes into the atmosphere.
It’s also critical to ensure your tank has plenty of oxygen during this phase. Good water circulation and aeration support bacterial colonization and maintain water quality. When your nitrate levels stabilize, and toxic compounds are no longer detectable, your tank is nearly ready for inhabitants.

🪴 Step 4: The Uglies – Algae and Other Growths
This stage is often the most frustrating for new reef keepers, but it’s a natural part of the cycling process. The "uglies" refer to common nuisance algae like diatoms, cyanobacteria (cyano), and hair algae. These usually appear once you turn on your tank’s lighting and ramp it up.
Although it may seem counterintuitive, it’s better to let these algae grow and then burn themselves out. They consume excess nutrients that have accumulated during the cycling process. Over time, they will diminish as their food source depletes.
In some cases, you might need to introduce a cleanup crew to help manage algae growth. However, the ultimate goal is to have a well-cycled tank with a natural balance that supports your corals and fish.
💧 Where Is My Soft Coral Tank in the Cycle?
After several weeks of letting the tank run with minimal intervention (mainly topping up the Auto Top Off or ATO), I checked in with my local aquarium expert to test the water and assess the tank’s progress. The tank had cleared up significantly from its initial murky state, and small algae patches were beginning to appear, signaling the start of the "uglies" phase.
Water tests showed:
- Perfect salinity (1.026 specific gravity)
- Low KH (carbonate hardness), which is common during cycling
- Phosphate levels were high due to live rock die-off
- Calcium was a bit low but easily corrected with a water change
- Magnesium levels were spot on
- Trace amounts of ammonia still present but expected to clear soon
The low KH is particularly important to address before adding any livestock, as it supports pH stability and overall coral health.
⚙️ Adding a Protein Skimmer to Help Complete the Cycle
At this stage, I decided it was time to add a protein skimmer to improve water quality and help finish off the cycle. The skimmer is essential for removing organic waste before it breaks down into harmful compounds, keeping the water oxygenated and clear.
We settled on the Mantis Tornado 120, a sleek, budget-friendly skimmer that fits comfortably and offers more capacity than needed, providing room for future livestock additions.
This model uses a non-controllable DC pump, which I actually prefer. Sometimes, too much control can complicate things. The manufacturer has optimized the pump speed and air intake for best performance—so it’s a simple "set it and forget it" solution.
The skimmer also includes bio blocks for additional bacteria colonization, improving filtration efficiency.
🔧 Setting Up the Skimmer: First Impressions and Adjustments
Unboxing and assembling the skimmer was straightforward, and the black, white, and clear color scheme fit perfectly in the sump without any visual distractions. The skimmer features a valve to adjust water volume and air inlet control, providing enough fine-tuning to dial in optimal performance without overcomplicating things.
On initial setup, I accidentally overflowed the skimmer because I placed it too low in the sump. After raising it slightly, I was able to adjust the water level so the bubbles break at the right spot, leaving space for the foam to develop properly without overflowing.
Protein skimmers usually take a few days to stabilize as biofilms form inside the body. I set it to a slightly lower water height initially to prevent any mishaps during this settling period.
⌛ One Week Later: Skimmer Performance and Tank Progress
After a week, the skimmer was producing fine bubbles and a nice foam, indicating it was running efficiently even though there wasn’t much waste left to remove apart from some residual live rock breakdown. The water clarity improved, and I felt confident that the cycle was nearly complete.
This skimmer is a perfect match for the tank, providing excellent filtration without overpowering the system or detracting from the tank’s aesthetics.
💡 Next Steps: Lighting, the Ugly Phase, and Livestock Introduction
The next big step is to install a strong lighting system to encourage the "ugly phase" algae growth. This may sound counterproductive, but it’s a natural part of the cycle that helps consume excess nutrients and prepares the tank for a stable environment.
Once the uglies burn out, I will introduce a cleanup crew to tidy the tank and then start adding soft corals and other livestock.
Additionally, I’m planning to get a custom polycarbonate jump lid from NVS Aquariums. This tank is a beautiful piece of living art, and I want a lid that complements its design while preventing any fish from jumping out—a costly mistake that’s easily avoided with a quality cover.
🤝 Final Thoughts and Community Support
This journey with a soft coral display tank is a perfect example of how patience, knowledge, and the right equipment come together to create a thriving marine environment. With over a decade of reef-keeping experience, I’m excited to apply modern equipment and methodologies to build the best soft coral display possible.
If you have questions or want to share your own experiences with the marine tank cycle or skimmers, please leave a comment below. I personally reply to every comment, and engaging with the community is one of the most rewarding parts of this hobby.
Also, a huge thank you to my channel members whose support makes videos like this possible. If you want to support the channel, subscribing is a free and easy way to help spread the word about reef-keeping.
❓ Frequently Asked Questions (FAQ) About the Marine Tank Cycle
What is the Marine Tank Cycle?
The marine tank cycle is the biological process in which beneficial bacteria convert harmful waste products like ammonia and nitrites into less toxic nitrates, eventually stabilizing the aquarium environment for safe fish and coral keeping.
How long does it take to cycle a marine tank?
The cycle can take anywhere from a few weeks to over a month depending on factors like tank size, live rock presence, and whether you use bottled ammonia or live fish to start the cycle.
Why is ammonia dangerous in a reef tank?
Ammonia is highly toxic to fish and invertebrates, even at low concentrations. It damages gills and tissues, which can lead to death if not controlled.
Can I add fish before the cycle is complete?
It’s best to wait until ammonia and nitrites are at zero and nitrates are stable. Adding fish too early exposes them to toxic water conditions and can cause health problems or death.
What role does a protein skimmer play in cycling?
A protein skimmer removes dissolved organic compounds before they break down into ammonia, helping maintain water clarity and oxygen levels, and supporting beneficial bacterial growth.
How do I know when my tank is fully cycled?
When ammonia and nitrites consistently test at zero, nitrates are present but stable, and algae growth (the "uglies") has started and begun to burn out, your tank is likely fully cycled and ready for livestock.
Is it normal to see algae during the cycle?
Yes, algae such as diatoms and cyanobacteria commonly appear during the cycling process once the light is introduced. This is a natural phase and usually resolves over time.
How can I prevent fish from jumping out of my tank?
Installing a properly fitted jump lid or cover is the best way to prevent fish escapes. Custom polycarbonate lids can be both functional and aesthetically pleasing.
This article was inspires from the video What Does a Marine Cycle Look Like? Plus Adding a Skimmer! with all credits to the creator.