A compact freshwater aquarium can bring an impressive planted or aquascaped display to a desk, kitchen counter, office, or small living space. The Maxspect Dice Series 2-Gallon Pico Cube is designed to make that possible with built-in filtration, heating, LED lighting, circulation control, and app-based controls.
This guide explains how to set up the Pico Cube safely, connect it to Wi-Fi, configure its key settings, and avoid common mistakes that can affect a small aquarium.
Table of Contents
- What Is the Maxspect Pico Cube?
- What to Prepare Before Setting Up the Aquarium
- Understand the Rear Filter Compartments
- Step-by-Step Pico Cube Setup
- How to Connect the Pico Cube to Wi-Fi
- How to Use the App Controls
- Everyday Features That Make Maintenance Easier
- Common Pico Aquarium Setup Mistakes to Avoid
- Where Can You Place a Desktop Aquarium?
- Key Takeaway
- Frequently Asked Questions
What Is the Maxspect Pico Cube?
The Maxspect Pico Cube is a compact 2-gallon smart freshwater aquarium with a concealed rear equipment compartment. Its small footprint makes it suitable for locations where a conventional aquarium would take up too much space.
The integrated system includes:
- Mechanical filtration with a removable filter pad
- Activated carbon for chemical filtration
- Ceramic spheres that provide biological filter media
- An integrated heater
- Adjustable circulation pumps
- An LED light with nature, enhanced, and custom colour modes
- Wi-Fi app controls for temperature, lighting, pump settings, and more
Its compact size is a strength, but it also means every setup decision matters. Keep the aquascape simple, avoid crowding the aquarium with large rockwork, and follow the maximum water line.
What to Prepare Before Setting Up the Aquarium
Before adding water, choose a stable, level location that can safely support the aquarium once full. Keep access to the lid, power connection, and rear filtration area clear.
Basic setup materials
- Conditioned freshwater
- A suitable aquarium substrate, such as fine sand
- Small, aquarium-safe hardscape such as stone or wood
- Optional live plants
- The supplied filter media and equipment
- A smartphone for Wi-Fi setup and control
For a simple aquascape, a shallow sand bed and a few small stones can create depth without overwhelming the limited swimming and planting space. Larger hardscape can quickly dominate a 2-gallon cube.
Understand the Rear Filter Compartments
The Pico Cube keeps most of its equipment out of sight in the rear section. Learning the compartment layout makes routine maintenance much easier.
The filter area includes a removable filter pad, a media section holding activated carbon and ceramic spheres, and a sponge covering the heater area. The media bags can be opened, replaced, and returned to their compartment.
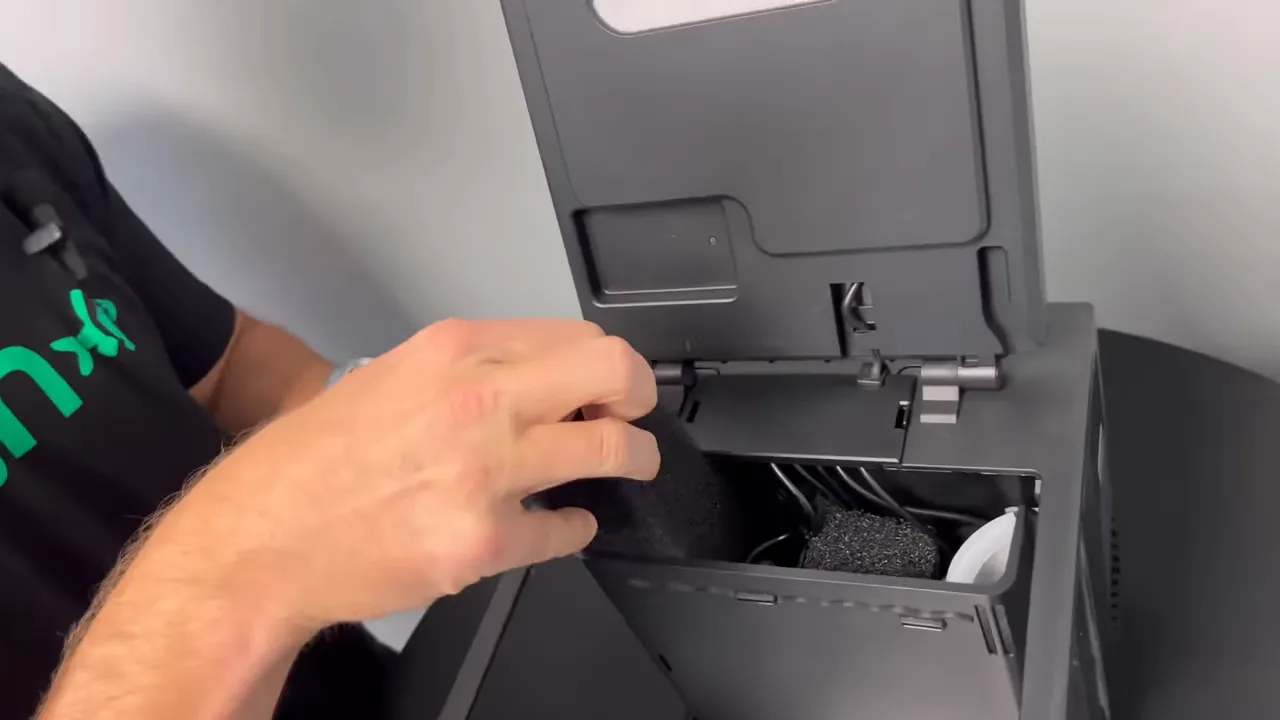
What each filter material does
- Filter pad: Captures suspended debris and is designed for easy removal, cleaning, or replacement.
- Activated carbon: Provides chemical filtration in its media bag.
- Ceramic spheres: Serve as biological filter media.
- Sponge: Covers the heater section and forms part of the filter arrangement.
Do not overfill the filter compartment or rearrange media in a way that restricts water movement. Ensure all supplied pieces are seated properly before closing the lid.
Step-by-Step Pico Cube Setup
1. Keep the aquarium unplugged while it is empty
Do not connect power before adding water. The pumps begin operating after power is connected, so the aquarium should be filled first.
2. Add substrate first
Pour the chosen substrate into the empty aquarium and arrange it before adding hardscape. A gradual slope can add visual depth while leaving open space around the front glass.
3. Add small hardscape
Place stones or wood carefully on the substrate. In a pico aquarium, use only a few appropriately sized pieces. The goal is to create a focal point without taking over the entire tank.
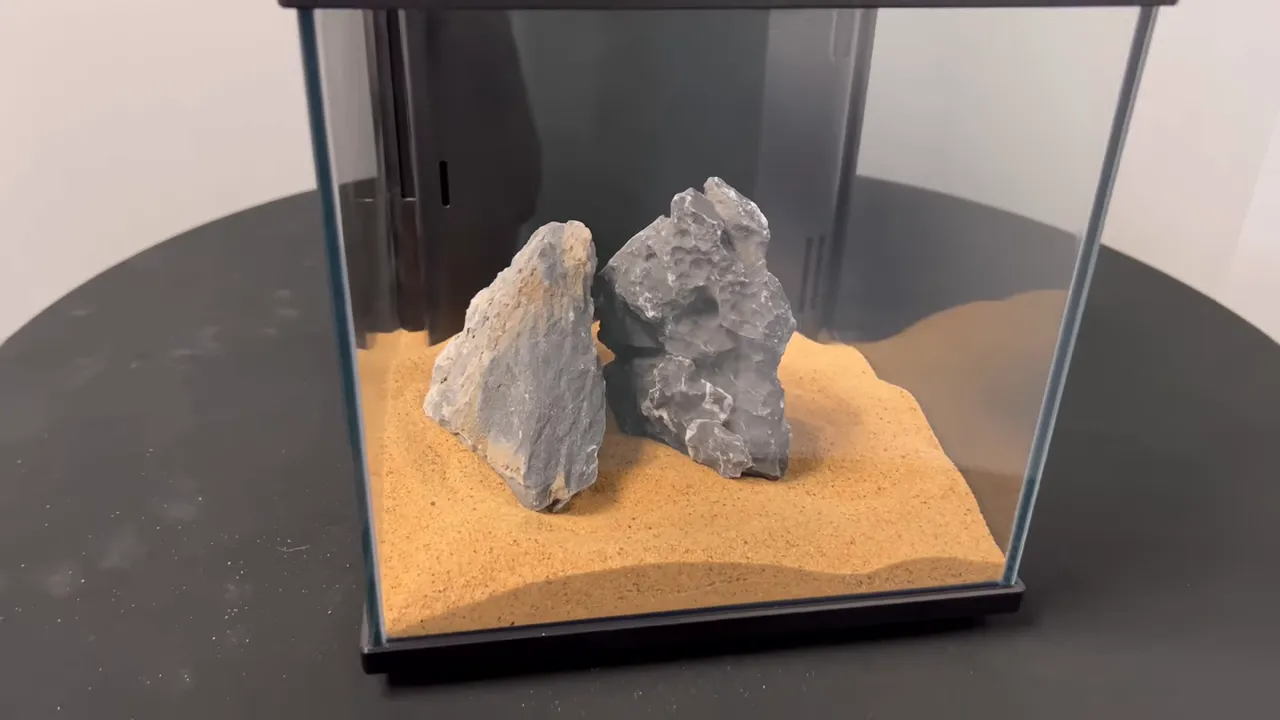
4. Fill through the rear section
Add conditioned water slowly into the back of the aquarium, rather than pouring directly onto the sand and stones from above. This allows water to enter the display gently and helps prevent the substrate and hardscape from being disturbed.
Fill only to the marked maximum water line. Do not exceed it.
5. Connect power and turn on the system
Once the aquarium is filled, connect the power cable at the rear. The pump may briefly start, and the top logo can blink white while the system is not yet fully switched on.
Hold the power button for about five seconds to turn on the system. Water movement indicates that circulation has started.
How to Connect the Pico Cube to Wi-Fi
Wi-Fi control allows the aquarium’s lighting, circulation, and heating settings to be managed from the compatible Cloud app.
Put the aquarium into Wi-Fi pairing mode first
Before opening the app, press and hold the power button and light button together for about two seconds. A beep confirms that the aquarium is ready to receive Wi-Fi information.
Install and register in the app
- Use the QR code in the manual to locate the compatible Cloud app.
- Install the app and accept its initial prompts.
- Allow location access while using the app. This permission is required for Wi-Fi connection.
- Create an account by selecting the registration option and entering a username and password.
- Select the option to add or register a device.
- Choose the PicoTank or Pico Cube from the available device list.
- Confirm that the aquarium is in pairing mode.
- Select the detected device and enter the Wi-Fi password when prompted.
- Wait for the connection process to complete.
If pairing does not begin, confirm that pairing mode was activated before beginning app setup. If the app cannot connect, check that location permission is enabled while using the app.
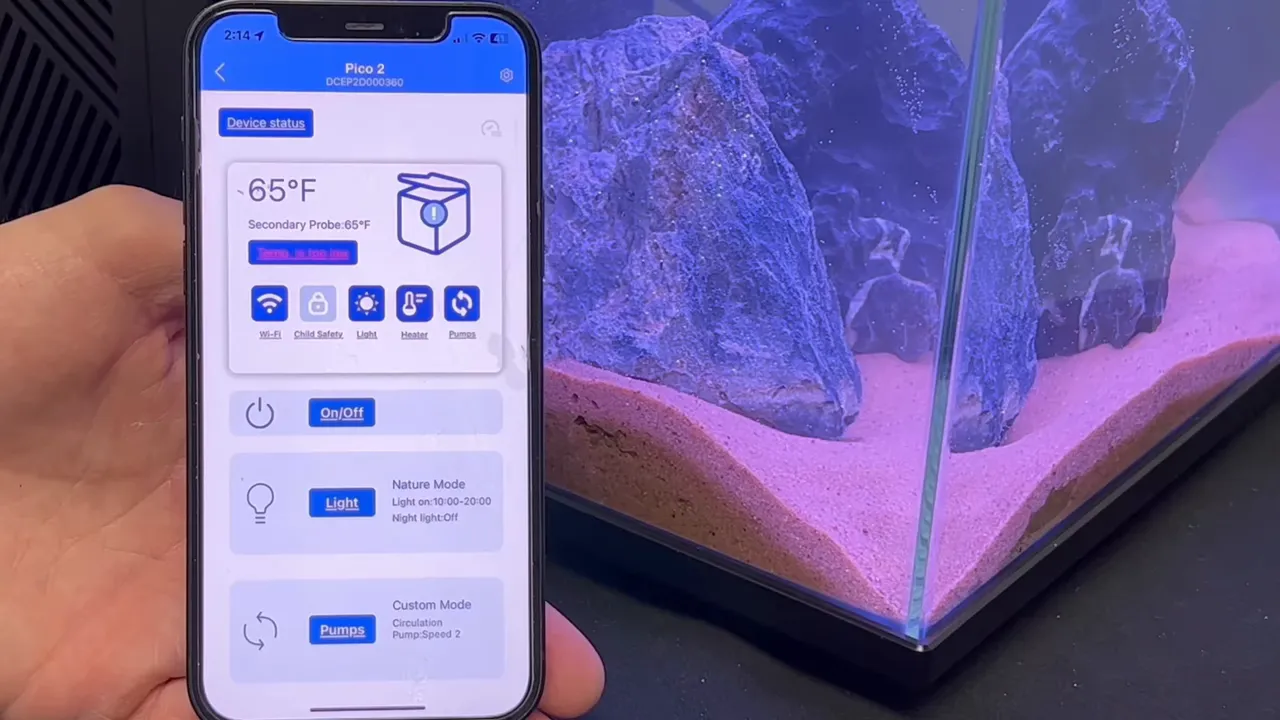
How to Use the App Controls
After connection, the app’s home screen displays the aquarium temperature and quick controls for the system, light, pump, Wi-Fi, child safety, and heater.
Temperature and heater controls
The dashboard shows the current temperature and can identify when it is below the intended range. For heater operation, use Smart Mode, which follows the operating parameters provided in the aquarium manual.
The heater settings also allow selection of a primary and secondary probe. Choose the preferred probe arrangement, then leave Smart Mode active for normal operation.
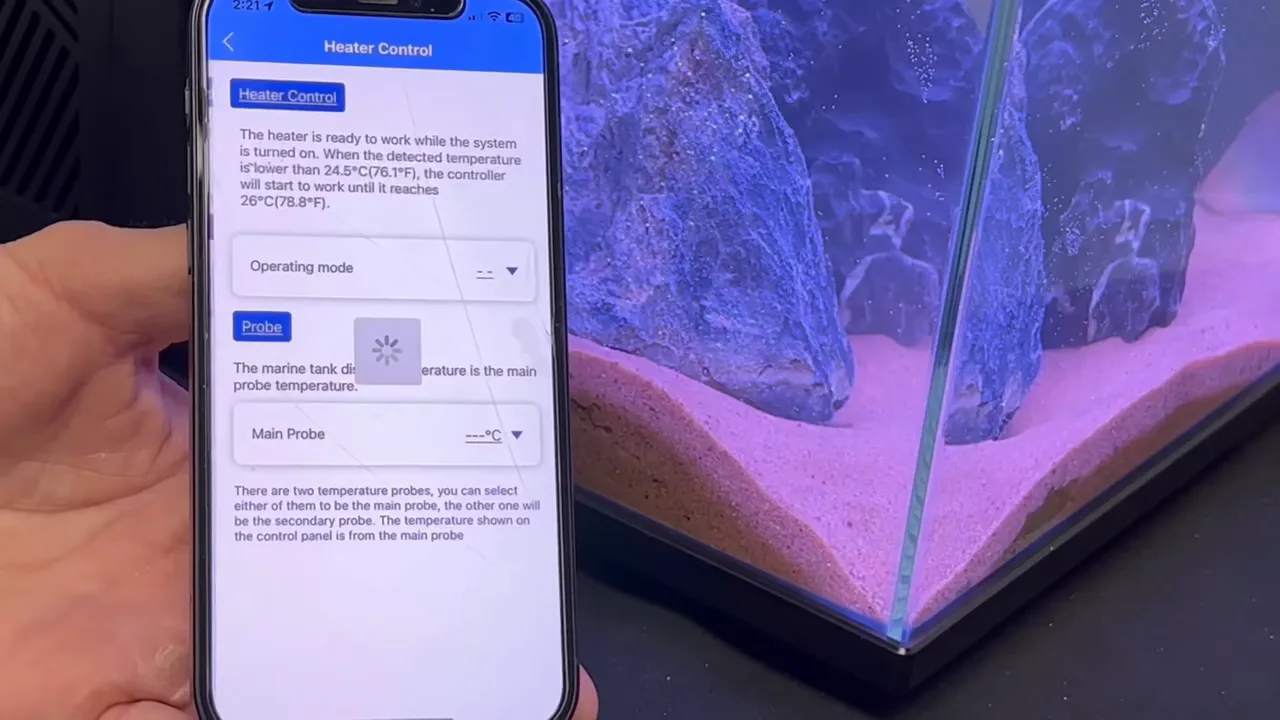
Lighting modes and schedules
The light controls provide three main modes:
- Nature mode: The standard freshwater lighting option.
- Enhanced mode: Includes hyper-red light intended to support plant growth.
- Custom mode: Allows adjustment of red, blue, and green colour channels.
You can also set a precise start and stop time for the light schedule. The app includes a nightlight option, which keeps a small blue light on after the main light turns off. Disable this option if complete darkness is preferred.
Automatic light-off can also be kept enabled. With this setting active, opening the lid turns off the LED light automatically.
Pump speed and night mode
The circulation setting has three speeds, with speed two as the default. Choose a lower or higher speed according to the needs of the aquarium’s inhabitants and aquascape.
Night mode reduces circulation to speed one during the night. If the normal setting is speed two or three, the pumps return to that chosen speed after night mode ends.
Everyday Features That Make Maintenance Easier
The top lid includes a dedicated feeding opening, so food can be added without fully opening the aquarium. When the lid is opened, the LED can switch off automatically if that feature is enabled.
The removable filter pad and accessible media bags also make it easier to inspect the filtration area without dismantling the entire aquarium. Regular checks help ensure that water can continue moving through the rear compartment as intended.
Common Pico Aquarium Setup Mistakes to Avoid
Plugging the aquarium in before filling it
The pumps begin running once the system is powered. Add substrate, hardscape, and conditioned water first, then connect the power.
Pouring water directly over the aquascape
Adding water through the front opening can displace sand and topple carefully arranged hardscape. Fill slowly through the rear section instead.
Overfilling above the maximum line
The marked high-water line is there for a reason. Stop filling at that line rather than attempting to maximise every bit of capacity.
Using oversized stones or too much décor
A 2-gallon aquarium has limited room. A few smaller hardscape pieces provide a stronger composition than a crowded arrangement of large rocks.
Skipping Wi-Fi pairing mode
The aquarium must be ready to receive a Wi-Fi signal before app registration can complete. Activate pairing mode with the power and light buttons before adding the device in the app.
Ignoring app permissions during setup
Location access while using the app is necessary for the Wi-Fi connection process. Denying that permission can prevent successful pairing.
Where Can You Place a Desktop Aquarium?
The Pico Cube’s small footprint suits many interior spaces, including a desk, home office, kitchen counter, living room, bedroom, or other compact display location. Choose a level surface, allow room to access the lid, and ensure the aquarium can be connected safely to power.
Its integrated technology makes it particularly practical where a separate heater, external filter, light fixture, and multiple control units would be inconvenient.
Key Takeaway
A successful Maxspect Pico Cube setup begins with a simple aquascape, conditioned water added through the rear section, and careful attention to the maximum water line. Once powered, Wi-Fi pairing unlocks controls for lighting schedules, circulation speed, heater settings, and temperature monitoring from the app.
Keep the layout uncluttered, maintain access to the rear filter compartment, and use the built-in Smart Mode and automatic lighting features to simplify daily operation.
Frequently Asked Questions
Should the Pico Cube be plugged in before adding water?
No. Add substrate, hardscape, and conditioned water before connecting power because the pumps begin running once the aquarium is powered.
Where should water be added when filling the Pico Cube?
Add water slowly into the rear section of the aquarium. This reduces disruption to the substrate and hardscape in the main display area.
What light modes are available in the Pico Cube app?
The app offers Nature mode for standard freshwater lighting, Enhanced mode with hyper-red light for plant growth support, and Custom mode for adjusting red, blue, and green channels.
Can the Pico Cube pump speed be adjusted?
Yes. The app provides three circulation speed settings. It defaults to speed two, and Night Mode can reduce circulation to speed one at night.
Why is location permission needed for Pico Cube Wi-Fi setup?
The app requires location permission while in use to complete the Wi-Fi connection process. Without it, the aquarium may not pair successfully.